ArmPi FPV AI Vision Arm: Learn Python + ROS Manipulation
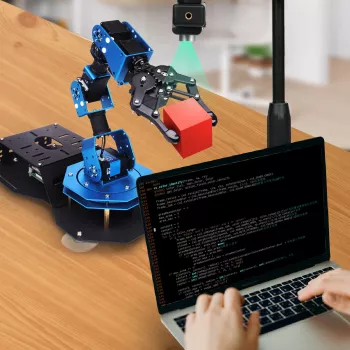
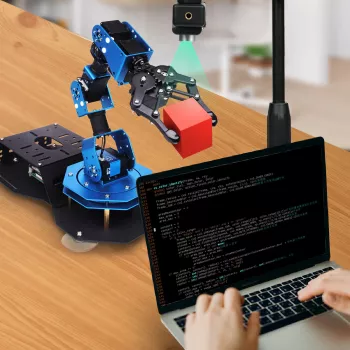
ArmPi FPV AI Vision Robotic Arm (Python & ROS Powered)
ArmPi is a programmable robotic arm built for hands-on robotics practice, combining FPV viewing, computer-vision workflows, and common development stacks like Python and ROS. It’s a strong match for labs, classrooms, and makerspaces that want a repeatable platform for learning perception, motion control, and practical integration with modern robotics tools—where you can see a detection result turn into real arm movement, not just a plot on a screen.
What the ArmPi platform is designed to do
- Serve as a practical training rig for robotic manipulation: pick-and-place basics, coordinate frames, and motion planning concepts.
- Support FPV-style operation for teleoperation and remote observation while testing grasping and movement routines.
- Enable AI-vision experiments such as color/shape detection, tracking, and camera-to-arm calibration workflows (depending on the software packages used).
- Provide a common development environment where Python scripts and ROS nodes can be used to organize perception, planning, and control.
Core capabilities for learning and prototyping
The ArmPi experience tends to click when it’s treated as a complete perception-to-action system: a camera produces frames, software extracts meaning, and the arm executes motion based on that interpretation. That end-to-end loop is what many robotics learners struggle to assemble from scratch.
- Python-friendly iteration: quick edits, rapid testing, and easy integration with common scientific/vision libraries.
- ROS-oriented structure: message passing, modular nodes, and standardized tooling for robotics development and debugging.
- FPV workflow: helps validate arm behavior from the camera’s point of view and simplifies demonstrations and remote sessions.
- AI vision pipelines: supports building perception-to-action loops (detect → decide → move), with room to expand into more advanced models on suitable hardware.
- Repeatable demos for teaching: object tracking, simple sorting, and scripted sequences that can be reset and rerun.
For deeper reference on the most common software building blocks, the official docs for ROS, OpenCV, and Python are useful companions when extending examples into custom projects.
Typical setups and use cases
- Classroom modules: coordinate transforms, camera calibration concepts, and basic manipulation tasks with observable results.
- Research prototyping: quick validation of perception-driven grasping ideas before moving to higher-end arms.
- Makerspace workshops: ROS introduction, computer vision exercises, and team challenges like “sort by color” or “follow the target.”
- Remote demonstrations: FPV viewing helps with streaming a live experiment for hybrid learning environments.
- Integration practice: connecting the arm to external sensors, dashboards, or ROS visualization tools (as supported by the chosen stack).
A practical classroom-friendly pattern is to start with a deterministic scene: consistent lighting, a known background color, and objects with high contrast. Once students can reproduce results across multiple runs, it becomes much easier to discuss why detection sometimes fails and how calibration and coordinate frames actually behave in the real world.
Software workflow: from camera frame to motion
Arm-plus-vision projects often feel complex until they’re broken into predictable stages. A clean split (especially in ROS) makes it easier to swap components without rewriting everything.
1) Perception stage
Capture frames, preprocess (resize/denoise), detect a target (color threshold, marker, or model output), then estimate a location in image space. At this step, stability matters more than sophistication: a steady, low-noise detection is usually better than a fragile “smart” detector.
2) Calibration stage
Map camera observations to the arm’s coordinate system (intrinsics/extrinsics), then validate with repeatable test points. Good calibration is what turns “pixel coordinates” into “reachable positions” with predictable error.
3) Planning and control stage
Convert target pose into a reachable goal, apply kinematics or planning tools, then send commands to the arm controller. Early on, keep movements slow and conservative so errors show up as small misses rather than collisions.
ROS best practice
Separate nodes for camera input, detection, state estimation, and motion control so parts can be upgraded independently. That modularity is valuable in teaching environments: one team can iterate on detection while another improves motion routines.
Quick comparison: where ArmPi fits among common learning platforms
| Platform type | Strengths | Trade-offs | Best for |
|---|---|---|---|
| Vision-enabled robotic arm (FPV + camera) | Perception-to-action projects, teleop demos, sorting/tracking tasks | Needs calibration, lighting control, and careful scene setup | Robotics courses, applied CV, manipulation basics |
| Basic servo robotic arm (no camera) | Simple motion scripting, kinematics exercises | Less feedback; perception projects require extra hardware | Intro motion control and programming |
| Mobile robot with camera | Navigation, tracking, mapping, autonomy concepts | Less focus on grasping/manipulation | Robotics navigation and perception fundamentals |
Practical tips for smoother builds and better results
Product details and availability
If the goal is an end-to-end workflow that connects vision, software structure, and arm motion into one platform, ArmPi FPV AI Vision Robotic Arm Python & ROS Powered is currently listed as in stock at $1254.99 USD.
Other in-stock picks
- Luxury Marble Round Coffee Table with Gold Stainless Steel Base
- Southeast Asian-Inspired Bamboo and Rattan Pendant Chandelier
- Rustic Wood Sideboard
FAQ
Is this suitable for beginners learning robotics?
Yes, it can be beginner-friendly when approached in guided steps—starting with teleoperation and simple motion scripts, then adding vision and calibration after the basics feel comfortable. The vision pipeline introduces extra variables (lighting, calibration, scene setup), so incremental progress is the fastest route to reliable results.
Can it be used with ROS for modular projects?
Yes. ROS is a natural fit for splitting the system into reusable pieces such as camera capture, detection, state/pose estimation, and motion control, connected through topics and launchable workflows. That structure makes debugging and swapping components much easier as projects grow.
What affects AI vision accuracy the most?
Lighting consistency, camera positioning, calibration quality, background contrast, and object reflectivity have the biggest impact. A controlled setup with repeatable object placement and step-by-step testing typically improves results more than aggressive algorithm changes.










Leave a comment